WinIPAC IPD is the I-PAC, Mini-PAC and J-PAC configuration
program. It's primary function is to tell the boards which keyboard
character(s) to send to the PC for each button or joystick on the
control panel. You configure this information using this program and
then download the settings to the I-PAC board, where they are held in
EEPROM even after power off.
You can also tell the program to download various keycode settings to
the board on-the-fly if you often run PC programs that need different
panel configurations. All of this programmable functionality is
entirely optional on the I-PAC range. If you leave the I-PAC set to
MAME defaults (which most people prefer to do until they have built and
tested their panel) you don't need to use this program.
So what is different about this program from all other existing
keyboard encoder configuration software? The answer is this: If you
think about the processes you go through to build a panel, the first
thing you do is assemble the panel, then you wire all of the switches
into the keyboard encoder. Then you might want to configure the encoder
to send specific keycodes for each switch. Before WinIPAC IPD, you
would have to refer to a note of how you have wired the panel, for
example if you wanted to have a dedicated "quit" button for MAME, you
would need to remember, for example, you have wired a button into the
Player1 Switch 8 input, and this needs to be set to the keycode for the
"esc" key. With WinIPAC IPD, the program already knows which button you
have wired to this input, and where it is physically located on the
panel, and you can simply click on this button and assign the code.
What's more, you can tell WinIPAC IPD that this is a "quit" button, by
entering text, and it will remember this and display the text on a
picture of the panel.
So WinIPAC IPD defines the steps in creating a panel as these: (all of
which are optional)
Once only (unless you have multiple panels):
Step 1) Create a pictorial view of your panel design
Step 2) Tell the program how you have wired it to the interface
Step 3) Save the panel.
Then as many times as you need:
Step 1) Assign keycodes by clicking on each control
Step 2) Optionally assign display text to each control
Step 3) Save configuration
Step 4) Associate a configuration with an application in the separate
Launcher program or in the MAMEWAH front end.
Other features:
Macros:
You can assign macros to any button. These are cumulative, each key is
pressed and held, so you can program, for example, CTRL/ALT/DEL to one
button.
On-Screen Keyboard Launcher:
Brings up a keyboard layout on the screen so you can configure using
only a mouse or trackball.
Application Launcher:
Start a separate program which can be used to assign keycode files to
any application and launch the app, having sent the file to the I-PAC
board. As well as the Ultimarc Launcher, the MAMEWAH front end can do
this.
Test Mode:
Use this to check operation of all buttons and switches.
Download to RAM instead of EEPROM (command line function):
This enables the codeset to be stored in temporary storage on the I-PAC
board instead of permanent storage.
Installation:
Ensure you have Direct-X ver 8.0 or later installed.
The Ultimarc CD has an auto-run menu which has an entry for installing
WinIPAC IPD. Or, navigate to the setup.exe program in the WinIPAC
folder. Depending on which fonts you have installed already on your
system, you may need to re-boot for the table view to display properly.
Note this program is not compatible with PS/2 keyboard/mouse dual-usage
ports as found on laptops.
Using the program:
WinIPAC IPD is really two programs in one. So these will be covered
separately.
The first time you start the program, a menu will appear. This will ask
you whether you want to use a default panel layout or not. The two
choices are:
"Use Default" This skips all of the panel layout tools and goes
straight into a table view which allows you to assign keycodes to the
I-PAC inputs. This mimics the operation of the older WinIPAC program
and is useful for quickly setting up your board when you know how the
panel is wired and you don't intend to change it in the future.
"Customize Panel" This choice is much more fun! You will enter
the first of the two sections of the program, Panel Design Mode, below.
Panel Design Mode:
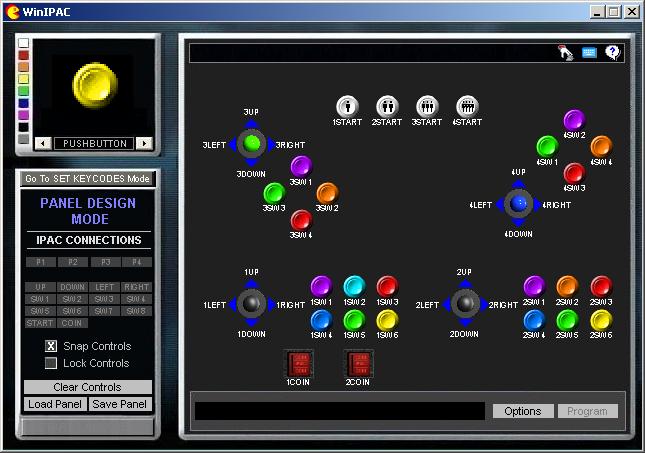
This is the first program of the two sections that make up WinIPAC IPD.
Normally you would enter this mode only once, when you build and wire a
panel. The only time you may want to go through this more than once is
if you have multiple panels. This is what you can do from this screen:
Design your panel.
The box in the top left corner contains a selection of different
control types, selectable by using the left/right arrows. Choose a
control, select a colour, then drag it onto the panel area on the
right. Repeat this until the correct number and type of controls have
been added. Then you can move and arrange the controls on the panel
into an approximation of your actual panel layout. You can add more
controls or remove them by dragging off the panel. You can change the
colour of existing controls by clicking on it and clicking on a colour
box on the left.
"Wire up" the panel.
Now you can tell WinIPAC IPD how you have wired each switch to the
I-PAC board. Keep in mind that we are thinking about actual I-PAC
connections here, as marked on the board, not keycodes or anything
related to any application program. For each switch, look at which
input it's connected to, then click on the switch, click on the Player
(1,2,3,4) and click underneath on the switch number. For example if the
I-PAC input is marked 1 DOWN, click on "P1", the "DOWN".
Save the panel.
You can save the panel layout and wiring information into a "CPL" file
and give it a name. WinIPAC IPD keeps a running copy of the panel
layout so this is only really necessary if you have multiple panels.
Now you are done configuring the actual panel layout and wiring, you
can forget about how you wired everything as it's all remembered by the
program. You can now assign keycodes.
Keycode Mode.
The program will actually start in this mode normally, unless you have
not yet configured a panel as described already. This mode allows you
to configure the assignment of keyboard characters sent for every
button and switch on your panel. This is something you might want to do
more than once, because you might have many PC applications, emulators
or other apps, which need different code configurations.
There are two ways to assign a keycode to each I-PAC input.
Table View:
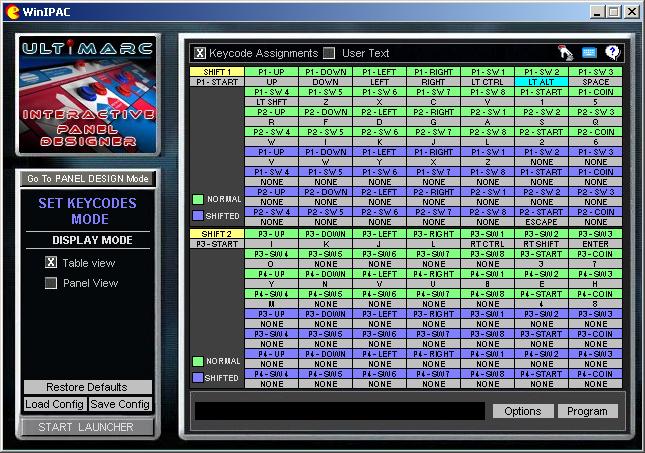
You can assign a keyboard code to each I-PAC input. You need to know
how your panel is wired up. To assign, click on the input required,
then press a key. Further options such as Macros are available by
right-clicking on the input. Volume up, Volume Down, Power, Sleep, Wake
and Mouse buttons are selected by right-clicking on the input.
Panel View:
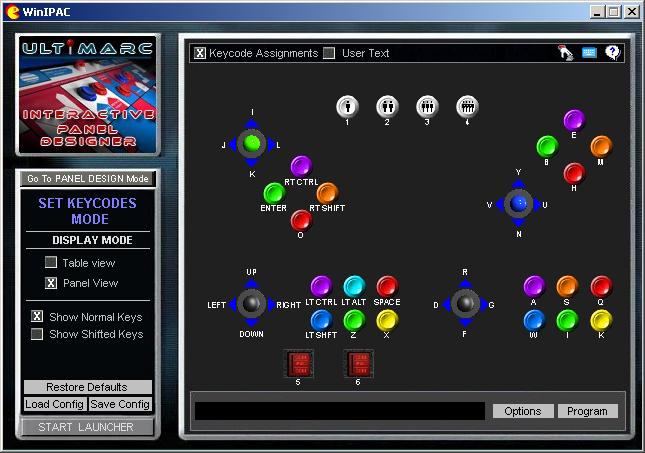
This is much cleverer than table view. As you have already created a
panel (see "panel design mode") the program knows what your panel looks
like and how it's wired up. So you can simply click on a button on the
picture of the panel and assign a keycode to it! The program looks at
it's records (actually the current CPL file) to see which I-PAC input
you mean, so you don't need to know this! Just click on a button and
press a key. Right-clicking gives more options such as macros.
Text View:

If you select this view, you can enter text against a button, and it's
saved in the current layout file (IPC file) not sent to the I-PAC at
all. Why would you want to do this? Well, think about it, let's say you
have a flight simulator. When you load the correct IPC file, you don't
have to remember that the middle button on the top row is "start
engines", because you can type this into the panel layout and it will
be remembered and displayed! Who wants to have to remember that
"ctrl-S" is start engines? You don't have to.
Other Functions:
The three icons on the top of the window are:
Test mode:
For testing that every button and switch gives the correct keycode.
On-Screen Keyboard:
For launching on-screen keyboard (Windows XP and 2000 only)
Help:
Opens the current help screen.
Launcher:
This button simply starts a program installed in the WinIPAC folder,
called "launcher.exe". The Ultimarc Launcher program would normally be
installed here, but you could install (and rename) any other program
such as a front end.
Reverse-lookup:
In table view, if you press any keyboard key or panel button, any input
which is assigned to this key will be highlighted in green.
Understanding the I-PAC shift feature.
The I-PAC has a feature which allows you to select one button to be a
shift button. This is normally "start1" but can be any button. You will
want to limit the choice to buttons that are not used intensively
during gameplay though. This button can still retain it's normal use as
well as being shift, or you can have a dedicated button just for shift.
Pressing and holding this button invokes a different set of keycodes
for all of the other buttons. These are normally used for control
functions such as quit, coin, etc. That way you don't need special
buttons for these functions and can retain the arcade-authenticity of
your panel (have you ever seen a real arcade machine with a coin insert
button on the panel!!??)
There is more in-depth information on how the shift function works
here.
Changing the Input
which acts as the Shift Button.
By default, the Start1 connection is the shift button.
You can change this as follows:
In Table View, click on the box under the cell marked "Shift" in the
top left corner.
Click on the required connection in the main table (for example
clicking on Start1 would re-assign the default).
Click "Program Board".
Running from the command line.
You can run WinIPAC IPD from a command line giving an "invisible" way
to download a specific keycode configuration to the I-PAC board. Just
enter "WinIPAC nnn.IPC" where the correct IPC file is specified. This
is how the Launcher program and MAMEWAH drives WinIPAC.
You can optionally tell WinIPAC IPD to leave a picture of the panel on
the screen with user text which you have assigned to each control, by
using the /t switch, ie "WinIPAC nnn.IPC /t"
If you suspect that command-line programming is not working, you can
try running with the "/verbose" switch which will display any errors on
the screen.
Conclusion.
We hope you have fun with this program! Please report any bugs or
suggestions to andy@ultimarc.com. Also, anything we have missed from
this documentation!