Default
Key
code table
| INPUT |
CODE
(Normal) |
CODE
(Start1 held) |
| 1
right |
R
arrow |
Tab |
| 1
left |
L
arrow |
Enter |
| 1
up |
U
arrow |
Tilde (adj volume, gamma, etc ) |
| 1
down |
D
arrow |
P (pause) |
| 1
B1 |
L-ctrl |
5
(Coin A) |
| 1
B2 |
L-alt |
|
| 1
B3 |
space |
|
| 1
B4 |
L-shift |
|
| 1
B5 |
Z |
|
| 1
B6 |
X |
|
| 1
B7 |
C |
|
| 1
B8 |
V |
|
| Start
1 |
1 |
|
| Start
2 |
2 |
Esc |
| 2
Right |
G |
|
| 2
Left |
D
|
|
| 2
Up |
R |
|
| 2
Down |
F |
|
| 2
B1 |
A |
|
| 2
B2 |
S |
|
| 2
B3 |
Q |
|
| 2
B4 |
W |
|
| 2
B5 |
I |
|
| 2
B6 |
K |
|
| 2
B7 |
J |
|
| 2
B8 |
L |
|
| Coin
1 |
5 |
|
| Coin
2 |
6 |
|
| Service |
F1 |
|
| Test |
F2 |
|
| Tilt |
F3 |
|
JAMMA
Connector Pinout
Connections in
RED
are used by J-PAC. Others are not connected.
| SOLDER SIDE |
|
|
COMPONENT
SIDE |
| GND |
A |
1 |
GND |
| GND |
B |
2 |
GND |
|
+5V |
C |
3 |
+5V |
|
+5V |
D |
4 |
+5V |
|
-5V |
E |
5 |
-5V |
|
+12V |
F |
6 |
+12V |
|
Key |
H |
7 |
Key |
|
Coin counter 2 |
J |
8 |
Coin
counter 1 |
|
Coin lockout |
K |
9 |
Coin
lockout |
| speaker (-) |
L |
10 |
speaker (+) |
|
NC |
M |
11 |
NC |
| green |
N |
12 |
red |
| composite sync |
P |
13 |
blue |
| Service switch |
R |
14 |
Video ground |
| Tilt |
S |
15 |
Test |
| Coin 2 |
T |
16 |
Coin 1 |
| Player 2 Start |
U |
17 |
Player 1 Start |
| Player 2 Up |
V |
18 |
Player 1 Up |
| Player 2 Down |
W |
19 |
Player 1 Down |
| Player 2 Left |
X |
20 |
Player 1 Left |
| Player 2 Right |
Y |
21 |
Player 1 Right |
| Player 2 Button 1 |
Z |
22 |
Player 1 Button 1 |
| Player 2 Button 2 |
a |
23
|
Player 1 Button 2 |
| Player 2 Button 3 |
b |
24
|
Player 1 Button 3 |
| Player 2 Button 4 (non-std) |
c |
25
|
Player 1 Button 4 (non-std) |
| |
d |
26
|
|
| GND |
e |
27 |
GND |
| GND |
f |
28 |
GND |
All the inputs which appear on a standard JAMMA interface are routed to
the JAMMA edge connector. The inputs which appear on the I-PAC but not
on a JAMMA connector are routed to screw terminals. If it is required
to connect extra non-JAMMA controls, follow the wiring instructions
below. The exception to the above is button 4 (both players). This
appears on some non-standard JAMMA cabinet connectors and is therefore
routed to screw terminals and the JAMMA edge connector. The J-PAC
programming utilities are identical to I-PAC and can be downloaded from
here.
The I-PAC LED harness is compatible with the 10-pin header on the
J-PAC. The
I-PAC programming instructions
apply to the J-PAC. Programming is optional, the board come
pre-configured with MAME keycodes.
Configuring
the Monitor Interface:
The monitor interface performs
the following functions:
- Routes all required signals
from the PC VGA port to the JAMMA edge connector.
- Determines if the frequency
being output from the PC is within the range for the arcade monitor.
Only enables the arcade monitor sync if within safe range.
- Indicates sync status by
means of LEDs.
- Converts VGA
horizontal/vertical sync to composite sync.
- Automatically caters for
positive and negative frame sync and converts if necessary. NOTE: It
does not convert positive horizontal sync. See later.
- Can be set to divide line
frequency by two so as to display a stableVGA picture on an arcade
monitor for test purposes. (actually displays two pictures side by
side)
To configure the monitor interface, install one jumper on the pair of
pins indicating the frequency your monitor is specified to operate at.
Most older arcade monitors operate at 15 Khz. Alternatively, if a 15Khz
monitor is being used, install jumpers on both the 15 and 31Khz
positions (default setting). This enables a stable picture to be
displayed during boot. See below.
If all jumpers are removed, the J-PAC will pass through composite sync.
This mode is used with our console adaptors.
IMPORTANT: The J-PAC does not convert or process the video signal in
any way except amplify it to the level required by an arcade monitor.
The sync frequency jumpers only control the sync-in-range safety check.
The PC must be configured to send the correct sync frequency for the
monitor unless our ArcadeVGA card is being used.
When the SYNC OK LED
is off, this indicates that no sync signal is being sent to the monitor
because it is out of the correct range for the monitor.
If you wish to
see a stable VGA picture during boot, set for "split screen mode".
install a jumper on both the 15 Khz and 31 Khz positions.
In this mode
when the PC is booted, a visible double picture should be displayed.
When the VGA frequency drops to 15 Khz the picture will return to
normal. This mode is for 15 Khz monitors only. The picture may not be
stable all the way from initial power-on.
The
quality of this divided picture varies with monitor type and VGA card.
Some
monitors may display this clearer than others and it is only intended
for checking that the PC and monitor is functioning, not as a usable
picture.
It may be necessary to adjust the monitor controls to a
setting which is OK for both normal and test mode. It is usually
possible to use this picture for DOS editing of configuration files
etc.
Sound:
The J-PAC does not contain any active sound circuitry owing to the
JAMMA standard not providing good sound capabilities (one speaker
only), nor any powerful enough voltage supply being readily available.
The JAMMA standard is mono sound. The JAMMA edge connector speaker
wires are routed to screw connectors on the J-PAC. These connections
can be used to connect a powered PC sound card to the cabinet speaker.
Alternatively for better quality stereo sound, simply use a normal pair
of PC speakers, either powered or passive, and place inside the cabinet
or wire to the cabinet speaker(s).
JAMMA
Cabinet Preparation:
It is usually preferable to remove any low-voltage game board power
supply which is fitted inside a JAMMA cabinet, leaving only the monitor
powered from AC mains (via the cabinet isolating transformer if
fitted).
With no game logic board to provide a load, most cabinet power
supplies would not work anyway.
Also keeping 12 volts away from the
J-PAC will eliminate the risk of damage in the event that the JAMMA
connector is ever plugged in backwards.
Another alternative is to
unplug the AC feed to the game board power supply. Ensure that doing
this does not also disconnect the ground!
IMPORTANT: If a cabinet power
supply IS still operating, make doubly sure the JAMMA connector is
plugged on the correct way round otherwise the J-PAC will be damaged as
12 volts would be applied to the inputs.
Most older arcade monitors
require an isolating transformer. DO NOT REMOVE THIS if fitted
otherwise the cabinet and monitor frame will be directly connected to
the mains power supply!
Double check the monitor frame and the control
panel are directly connected to ground. If the ground is poor, a
voltage could build up on the cabinet connections which is not only
dangerous but will destroy the J-PAC.
Be especially careful if you have
removed the power supply as this may result in breaking the grounding
of the monitor which could have been routed through the power supply.
Connecting
to the JAMMA harness and PC.
Configure the PC to run the VGA card at the correct frequency for the
arcade monitor. For a standard-res monitor this will require special
software and/or drivers
unless you are using an ArcadeVGA card.
These drivers will be invoked
during the PC boot process or start-up of an emulation front-end or
emulator itself. There will therefore be a period of time at start-up
when the PC will not be providing the correct output for the arcade
monitor. The special circuitry on the J-PAC will ensure the monitor
does not attempt to operate outside its range.
Check grounding
of the cabinet before proceeding to avoid any danger/damage. The best
method of doing this is as follows: Using an ohmmeter or continuity
tester check for a good connection between the following points:
- Monitor frame JAMMA edge
connector ground pins. These are the 4 pins at
either end of the connector.
- Mains power cord ground.
- Control panel
ground.
- Power supply ground if
fitted.
Now connect the JAMMA connector.
Double check it is the correct way round, especially if it is not
fitted with a key.
Connect the keyboard interface cable from the DIN
connector marked “PC KB/USB” to the PC keyboard
port or USB port.
Connect the video cable from the connector marked "PC
VGA” to the VGA card.
Connect a pass-through keyboard to the
connector marked “KBD” (optional).
If you are using
the LED harness, plug it onto the 10 pin header. Note that one pin of
the header is missing. This is to ensure the polarised plug can only be
inserted the correct way round.
CONNECTING
ADDITIONAL NON-JAMMA CONTROLS (eg buttons 5-8)
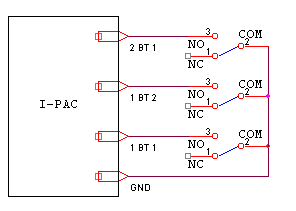
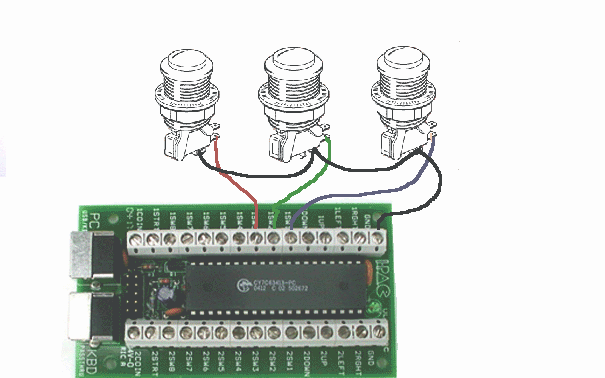
Connect one side of each switch to the screw terminals as indicated on
PCB.
"Daisy chain" the other side of all switches together and connect
to either of the "GND" terminals on PCB. Some micro-switches have 3
connections – only use the ones marked "NO" and "COM". Don't
connect anything to the "NC" tag.
Below is a diagram showing an example
of 3 joystick micro-switches connected to inputs on the J-PAC board.
The gauge of wire used is not critical. Any insulated stranded wire
will do providing it is thick enough to be gripped by the screw
connectors. The wire we supply in our wiring kit is 16 X 0.2 mm.
You can connect more than one switch to one J-PAC input, to perform the
same function. For example you might want to have side flipper buttons
connected to the same inputs as fire buttons as these are used in
different games. This applies to joysticks too. You can connect a 4 and
an 8-way stick to the same inputs. (But check our 4-8 way switchable
sticks though!)
Power on the PC. The “SYNC IN” LED should light
indicating the J-PAC is receiving a sync signal from the PC. The
“SYNC OK” LED will light when the PC has switched
into the correct video mode for the monitor, and then the monitor
should display a picture.
The Self test LED flashes and then should light continuously.
It is very likely that you will need to adjust the monitor H sync, V
sync and size controls, even if it was previously working with a game
board.
CONTROL
CONFIGURATION AND TESTING.
The board automatically detects which interface it is connected to (USB
or PS/2).
You do not need to install any
drivers or software from the Ultimarc CD to get the board to operate.
There are no third-party drivers for the J-PAC.
When the board is first powered on, it contains a pre-loaded code set.
This matches the MAME default key codes as the table above indicates.
For many people there is no need to do any re-assignment, just power up
and play.
You may want to re-program the codes if any of the following
apply: ·
- You use an emulator or other
PC application without
a key re-mapper.
- You don't want people to be
able to access
the MAME game config menus by using shift buttons (for example game
contests etc)
- You want to limit coin
insert to a real coin
slot rather than using shift button feature.
Basic Testing
Boot PC into DOS or Windows and run a text program such as Notepad.
Observe the self-test LED on the J-PAC which should display a flash
pattern and then light continuously.
Press various player 2 buttons (some of the player 1 buttons are mapped
to non-displayable codes such as ALT so best to use player 2). You
should see characters displayed, just as if they were typed on the
keyboard.
ADVANCED
TESTING (optional)
If in
DOS, enter COPY CON to suppress the command prompt. On a keyboard
plugged into the pass-through, press CTRL-ALT-P. (press and hold each
key in this order). Enter "T" in the menu to enter test mode. All
pressed buttons and joysticks will be displayed on the screen. The
input will be shown, followed by the code which is currently assigned,
followed by the shifted code, if one is assigned. Test all buttons and
joystick switches. If all OK reboot to exit. Now ready to play!
PROGRAMMING
(optional)
There are two methods of programming the board. The WinIPAC IPD utility
can be downloaded and run from Windows or IPACUTIL in DOS See
programming instructions
for details, OR you can enter the Interactive Programming and Test Mode
by pressing CTRL-ALT-P on a keyboard connected to the pass through. See
here for
instructions. You might also have to do some setting-up in MAME because
buttons 5 and 6 are not normally assigned by default in MAME and must
be programmed. (press tab in any game).
SHIFT
MODE
Pressing and holding
1player
start enables shift mode with
access to the following keys (when "MAME" setting is used):
2
player start=Esc – for
jumping back to the menu
Joystick
left=Enter – for
running games in Windows and for MAME game config menu
Joystick
right=Tab – for
entering MAME config menu
Joystick
up=~ - for entering MAME
volume/gamma menu
Joystick down=P
MAME pause key
1 fire (button
1)=5 – for simulating
coin insert.
The above shift keys can be changed/turned off as required if the board
is programmed. MAME HINT: to get past "Type OK to continue" prompt,
just move joystick left then right.
NOTES:
PC should pass BIOS keyboard self-test with or without a normal
keyboard connected. The unit is capable of being used in a closed
arcade cabinet with no additional keyboard or controls and motherboard
booting into an emulation menu. If an auxiliary keyboard is connected
it can be used fully and even used during gameplay alongside your
control panel.
USB
NOTES:
In USB mode the keyboard pass-thru connector does still work, and the
J-PAC translates the PS/2 keyboard protocol into USB. This is primarily
for using
interactive
programming and test mode. It is
recommended that, with J-PAC in USB mode, you normally connect your
PS/2 or USB keyboard directly to the PC.
USB
DOS SUPPORT:
Most PCs support a USB keyboard in DOS mode so J-PAC in USB mode MAY
work in DOS. (USB keyboard support may have to be enabled in the BIOS).
HOWEVER: many BIOSes have poor USB support which prevent use for
gaming, as the response is too slow. USB is intended for Windows use,
either in a "DOS box" or a windows application.
USING
A J-PAC and I-PAC TOGETHER:
This combination can be used for 4-player cabinets. The second board
can be connected to the pass-thru connector of the first. Or either
connect both boards to USB or the first to the keyboard port and second
to USB. Each board can be individually programmed with the required
code set, then the two boards can be connected together as above.
LEDs:
The three LEDs use the following inputs, which become bdirectional:
Player 1 Button 7
Player 2 button 7
Player 1 button 8
These inputs can still be used for buttons even if LEDs are connected
but note that when the buttons are pressed the LEDs will light. You can
wire your own LEDs to these connections.
LED
HARNESS:
(Optional). The LED harness plugs onto the 10-way header on the board.
The LEDs are connected to the harness via a removeable plug. This can
be disconnected to allow the LEDs to be mounted through a panel. Ensure
to note which way round the plug is fitted to the LED. The LEDs can be
tested by pressing caps lock, scroll lock and num lock on a pass-thru
keyboard.
IMPORTANT
NOTE!
The LED harness and the PCB take 5 volts from the PC motherboard.
Ensure no exposed parts of either touch to ground. If this occurs the
motherboard could be damaged. Most motherboards supply the 5 volts to
the keyboard connector via a tiny wired-in fuse which looks like a
resistor. If the 5 volts is shorted this fuse will need to be replaced
which is not easy!
Mount the PCB on a wooden control panel or other insulator, or if this
cannot be done, use stand-off pillars. When the LEDs are connected to
the harness a small length of pin is left exposed. This can be bent
over to secure the plug and should be insulated with tape as one pin on
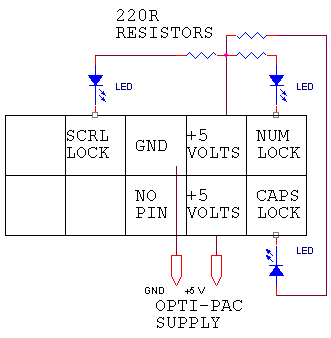
each LED is connected directly to 5 volts.
HEADER
PLUG AND LED WIRING DIAGRAM:
The diagram below will help if you decide to make your own LED
connections. The header plug pins are shown looking from the top.
Troubleshooting
General Approach:
The on-board self-test LED gives a display of functional checks, see
later in this section for more details.
Remember that the J-PAC emulates a keyboard. So if you bear this in
mind, you can use any program that displays text to test the response
with certain limitations. Notepad or the DOS prompt can be used for
example. You can connect a short piece of wire to GND and use the other
end to touch onto various input connections, and characters should be
typed on the screen. Bear in mind, though, that the default MAME
configuration includes many non-printing keys such as ALT, CTRL and the
arrow keys, so trying the player 2 inputs is best as these are all
printable characters.
But Notepad or DOS cannot tell you whether an input is "stuck" though
so is not a complete test. For this you need to use the
I-PAC test
mode
or
Ghostkey.exe. (A
DOS
program). For Windows, the best test by far is the
Passmark
keyboard Test
which we can recommend downloading. It's a 30-day trial version but
hopefully you will have it working by then!
Problem: Player 2 buttons 5
and 6 not working.
This is not a J-PAC problem! By default, MAME does not have these
buttons assigned to any keycodes. Just go into the MAME controls menu
(press tab in a game) and assign them. Button 5 is "I" and Button 6 is
"K".
Problem:
No shift functions work.
Part of the shift function design means that to avoid "stuck" keys,
shift functions are disabled when any key is pressed. So loss of shift
functions means you have a shorted or stuck switch. Problem is, which
one? There are two ways to determine this. The on-board LED gives an
indication of which input is shorted, see later in this section.
Or use the built-in test mode:
Run any text-display program such as Notepad, or if you are in DOS type
"COPY CON" to turn off the command prompt. With a keyboard plugged into
the pass-through port, press CTRL-ALT-P (press and hold each key in
this order). You will see a
menu. Enter "T" for test mode. The offending stuck input(s) will be
displayed on the screen.
Problem:
Cannot program. Utility hangs at end of
programming.
If you are using the PS/2 connection, and do not have any USB keyboard
on your PC, you will need to check that in the PC BIOS, "USB keyboard
support" or "Legacy USB Support" is DISABLED, otherwise WinIPAC will
not program properly.
Another cause of this is having non-switch items connected to inputs.
In general, the inputs must be "open" (ie no switch pressed) for
programming to work. This may not be the case if you have other things
connected such as a game board connected at the same time as the J-PAC.
Email for further advice on this if you must have other devices
connected as there are workarounds.
Problem:
Erratic behaviour of joystick
directions. Shift functions not working. "Stuck" keys.
A very common cause is connection of the inputs to the "NC" contact on
the switches instead of "NO". See the "no shift functions work" heading
above for more info. This type of problem usually occurs when a large
number of switches are incorrectly connected. The self-test LED will
indicate this problem.
Problem:
Slow response and stuck keys in
Windows 98 when using I-PAC in USB mode.
This is caused by the motherboard USB controller not working in
Windows. The keyboard (and therefore J-PAC) is relying on the slow BIOS
for support instead of the Windows USB controller drivers. Go into the
BIOS setup and disable USB keyboard support or "legacy port 60-64
support". If the J-PAC stops working completely then this is the
problem. Now go into device manager in Windows and check the USB
controller for any driver problem.
Problem:
In USB mode, the J-PAC was not
detected properly once before and now I can't get it out of this state.
You will need to remove it from
Windows and let it re-detect. Go into
Control Panel, System, Device Manager, Hardware. Open up the USB
controller by clicking on the plus sign next to it. Under this heading
will be displayed all the USB devices. Right click on all devices one
by one except the controller itself and Root Hubs and select
"uninstall". Now unplug and re-plug the J-PAC. It should be
re-detected.
Problem:
In USB mode, it is only detected
as "Unknown Device" or "device has a problem".
Under certain conditions,
shorted inputs can cause this, or inputs that
are held at 5 volts. This may happen either because of a wiring error
(see steps for checking this, above) or the J-PAC inputs being
connected to something other than an open-circuit switch. If you need
to connect non-switch devices please email for advice.
Problem:
Keys intermittently sticking in one
direction.
This is usually not an J-PAC
problem. If you check the I-PAC
installation using the
Passmark
Keyboard Test you
will probably find that this works fine and you may need to look
elsewhere on your PC installation such as some errant software
consuming PC resources.
Problem:
(USB Only) Board appears not to
work until WinIPAC is run every time following reboot. Yellow
exclamation marks in Control Panel, Device Manager.
This is a rare Windows XP
problem (fixed in Vista), and is caused by a
registry error. It is suspected that this problem occurs if the board
is regularly swapped from one USB port to another, or different board
versions used on the same PC.
Ensure you are using the latest version of WinIPAC (March 2007) which
has a permanent workaround for this problem. Installing the latest
version should cure the problem with no further action needed.
Using
the Self-Test LED
The self-test LED indicates status and errors by using flash patterns.
This is the sequence of events
on power-up:
Power applied: One short flash
Then
PS/2 Interface detected: a second short flash and then if switch test
passed: LED stays lit
Or
USB Interface detected
Then
USB Interface initialized by PC and switch test passed: LED stays lit
Or
If inputs test fails: LED flashes a number of times to indicate which
switch is shorted or faulty. LED then stays off. This does not
necessarily mean the board will not work, but indicates a switch wiring
or other problem which should be investigated. Check the table below
for the failing input. Check switch wiring. Try disconnecting this wire
and see if the flash pattern changes.
Error Conditions:
LED never lights:
Board faulty, cable faulty, PC not powering up correctly.
LED
gives two short flashes and
the I-PAC is connected via
USB:
The board has mis-detected a PS/2 interface. Check USB controller is
enabled and working on the PC. Try another USB device as a test.
LED
gives one short flash then
stays off:
I-PAC has detected a USB controller but the PC is not detecting the
device as having been connected. Check USB drivers on PC.
LED
flashes 3 or more times
after initially lighting:
Switch test failed. Check chart below for failing input. Check switch
wiring. Try disconnecting this wire and see if the flash pattern
changes.
Switch test failure codes.
Count
the number of flashes after the first time the LED
lights
The table shows the input which needs to be investigated. Check for
incorrectly-wired switches. Try disconnecting this switch. The test
might now pass. If more than one input is failing, the pattern may
change, indicating a second failing input.
| Number
of Flashes |
I-PAC
VE |
I-PAC
2 |
J-PAC |
I-PAC
4 player 1-2 |
I-PAC
4 player 3-4 |
| Stays
on constantly |
1
D |
1
sw 6 |
1
sw 6 |
|
|
| 3 |
1
right |
2
up |
1
up |
|
|
| 4 |
2
right |
2
right |
coin
1 |
|
|
| 5 |
1
left |
2
sw 1 |
2
up |
coin
1 |
coin
3 |
| 6 |
2
left |
2
left |
coin
2 |
2
right |
4
right |
| 7 |
1
up |
2
sw 3 |
1
down |
coin
2 |
coin
4 |
| 8 |
2
up |
2
down |
start1
|
2
left |
4
left |
| 9 |
1
down |
2
sw 5 |
2
down |
start1
|
start3 |
| 10 |
2
down |
2
sw 2 |
start
2 |
2
up |
4
up |
| 11 |
1
sw 1 |
1
right |
1
left |
start
2 |
start
4 |
| 12 |
2
sw 1 |
2
sw 4 |
2
sw 8 |
2
down |
4
down |
| 13 |
1
sw 2 |
1
left |
2
left |
1
right |
3
right |
| 14 |
2
sw 2 |
start1
|
2
sw 6 |
2
sw 1 |
4
sw 1 |
| 15 |
1
sw 3 |
1
up |
1
right |
1
left |
3
left |
| 16 |
2
sw 3 |
|
|
|
|
| 17 |
1
sw 4 |
1
down |
2
right |
1
up |
3
up |
| 18 |
2
sw 4 |
|
|
|
|
| 19 |
1
sw 5 |
1
sw 1 |
1
sw 1 |
1
down |
3
down |
| 20 |
2
sw 5 |
coin
2 |
2
sw 5 |
2
sw 2 |
4
sw 2 |
| 21 |
1
sw 6 |
1
sw 2 |
2
sw 1 |
1
sw 1 |
3
sw 1 |
| 22 |
2
sw 6 |
coin
1 |
2
sw 4 |
2
sw 3 |
4
sw 3 |
| 23 |
start1 |
1
sw 3 |
1
sw 2 |
1
sw 2 |
3
sw 2 |
| 24 |
start2 |
start
2 |
1
sw 5 |
2
sw 4 |
4
sw 4 |
| 25 |
coin
1 |
1
sw 4 |
2
sw 2 |
1
sw 3 |
3
sw 3 |
| 26 |
coin
2 |
1
sw 8 |
1
sw 6 |
2
sw 5 |
4
sw 5 |
| 27 |
1D |
1
sw 5 |
1
sw 3 |
1
sw 4 |
3
sw 4 |
| 28 |
2D |
2
sw 7 |
1
sw 7 |
2
sw 6 |
4
sw 6 |
| 29 |
1C |
1
sw 6 |
2
sw 3 |
1
sw 5 |
3
sw 5 |
| 30 |
2C |
2
sw 8 |
1
sw 8 |
2
sw 7 |
4
sw 7 |
| 31 |
1B |
1
sw 7 |
2
sw 7 |
1
sw 6 |
3
sw 6 |
| 32 |
2B |
|
|
2
sw 8 |
4
sw 8 |
| 33 |
1A |
|
|
1
sw 7 |
3
sw 7 |
| 34 |
2A |
2
sw 6 |
1
sw 4 |
1
sw 8 |
3
sw 8 |
Video
Problems.
Problem: Scrambled Video
Almost all video related problems are related to the lack of 15Khz
arcade monitor support of the video card. The J-PAC cannot do any
video processing (other than amplification) so any strange pictures are
not directly attributable to the J-PAC.
Our ArcadeVGA card is the only VGA card which sends a 15Khz video
signal from power-up.
Incompatible video can cause
all kinds of strange lines, many duplicate pictures across the screen,
etc. (don't confuse this with the J-PAC test "scan divide" mode which
occurs when the J-PAC is dividing a VGA picture in half to get a stable
15Khz display during boot-up. This is enabled when the 31 and 15 Khz
jumpers are both on, and the PC is sending a 31Khz signal).
Problem: Rolling. No LEDs lit
Ensure the J-PAC is connected to the PC USB or Keyboard port. It takes
power from this source.
