ipac2.html
Default
Keycode Table
|
INPUT
|
PRESET
CODES |
|
|
NORMAL
CODES |
CODES
WITH SHIFT
(hold 1 player start)
|
| COIN
1 |
5 |
|
| COIN
2 |
6 |
|
| START
1 |
1 |
|
| START
2 |
2 |
ESC |
| 1 RIGHT |
R arrow |
Tab |
| 1 LEFT |
L arrow |
Enter |
| 1 UP |
U arrow |
Key Below ESC (Volume,
gamma, etc ) |
| 1 DOWN |
D arrow |
P (pause) |
| 1 SW 1 |
L-ctrl |
5 (Coin A) |
| 1 SW 2 |
L-alt |
|
| 1 SW 3 |
space |
|
| 1 SW 4 |
L-shift |
|
| 1 SW 5 |
Z |
|
| 1 SW 6 |
X |
|
| 1 SW 7 |
C |
|
| 1 SW 8 |
V |
|
| 1
A |
P |
|
| 1
B |
ENTER |
|
| START 1 |
1 |
|
| START 2 |
2 |
Esc |
| 2 RIGHT |
G |
|
| 2 LEFT |
D |
|
| 2 UP |
R |
|
| 2 DOWN |
F |
|
| 2 SW 1 |
A |
|
| 2 SW 2 |
S |
|
| 2 SW 3 |
Q |
|
| 2 SW 4 |
W |
|
| 2 SW 5 |
I |
|
| 2 SW 6 |
K |
|
| 2
SW 7 |
J |
|
| 2
SW 8 |
L |
|
| 2 A |
TAB |
|
| 2 B |
ESC |
|
| THE
FOLLOWING CODES
FOR THE I-PAC4
ONLY |
| COIN
3 |
7 |
|
| COIN
4 |
8 |
|
| START
3 |
3 |
|
| START
4 |
4 |
|
| 3
RIGHT |
L |
|
| 3
LEFT |
J |
|
| 3
UP |
I |
|
| 3
DOWN |
K |
|
| 3
SW 1 |
R-CTRL |
|
| 3
SW 2 |
R-SHIFT |
|
| 3
SW 3 |
ENTER |
|
| 3
SW 4 |
O |
|
| 3
SW 5 |
|
|
| 3
SW 6 |
|
|
| 3
SW 7 |
|
|
| 3
SW 8 |
|
|
| 4
RIGHT |
U |
|
| 4
LEFT |
V |
|
| 4
UP |
Y |
|
| 4
DOWN |
N |
|
| 4
SW 1 |
B |
|
| 4
SW 2 |
E |
|
| 4
SW 3 |
H |
|
| 4
SW 4 |
M |
|
| 4
SW 5 |
|
|
| 4
SW 6 |
|
|
| 4
SW 7 |
|
|
| 4
SW 8 |
|
|
Using
the built-in code set
When the board is first powered on, it contains a pre-loaded code set.
This matches the MAME default key codes as the table above indicates.
For many users there is no need to do any re-assignment, just power up
and play.
You may want to re-program the
codes if any of the following
apply:
- · You use an
emulator or other PC application
without a key re-mapper.
- · You don't want
people to be able to access the
MAME game config menus by using shift buttons (for example game
contests etc)
- · You want to
limit
coin insert to a real coin slot
rather than using shift button feature.
Installation
You do not need to install any
drivers or software from the
Ultimarc CD to get the board to operate.
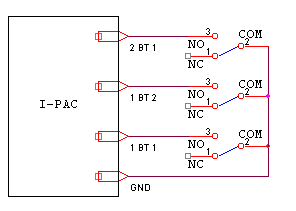
Connect
one side of each switch
to the screw terminals as
indicated on PCB. "Daisy chain" the other side of all switches together
and connect to either of the "GND" terminals on PCB. Some
micro-switches have 3 connections – only use the ones marked
"NO" and "COM". Don't connect anything to the "NC" tag. Below is a
diagram showing an example of 3 joystick micro-switches connected to
inputs on the I-PAC board.
The
gauge of wire used is not
critical. Any insulated stranded
wire will do providing it is thick enough to be gripped by the screw
connectors. The wire we supply in our wiring kit is 16 X 0.2 mm.
You can connect more than one switch to one I-PAC input, to perform the
same function. For example you might want to have side flipper buttons
connected to the same inputs as fire buttons as these are used in
different games. This applies to joysticks too. You can connect a 4 and
an 8-way stick to the same inputs. (But check our 4-8 way switchable
sticks though!)
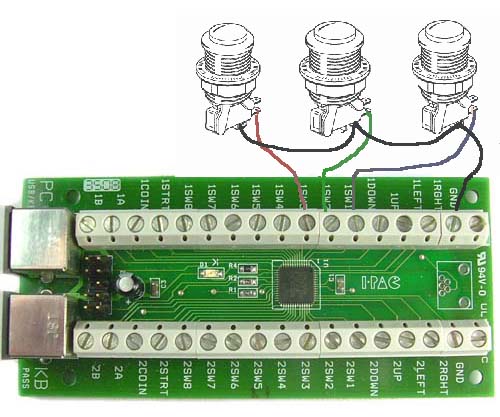
The I-PAC 2 and I-PAC 4 use
screw connectors for the controls:
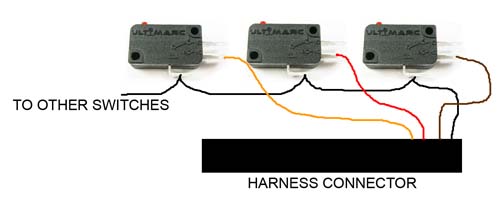
The Mini-PAC and I-PAC UIO
use a supplied wiring harness. The harness comes in two sections. There
is a "daisy-chain" ground harness and a 32-way switch harness.
The first step is to connect
the male end of the black ground harness to the black wire on the main
harness. Then connect to every switch. The example below shows 3
connected switches:
Plug
one end of cable into the USB connector and other
end to motherboard USB connector.
Start windows.
Windows will detect the device and automatically load
drivers. The drivers for this device are already within Windows. There
are no Ultimarc drivers for the I-PAC.
Basic
Testing
Boot PC and
run a text program such as Notepad.
Observe the LED on the I-PAC should be ON in normal use. If there is a
failure detected during power-up, the LED will flash a number of times
then stay OFF.
Press various player 2 buttons (some of the player 1 buttons are mapped
to non-displayable codes such as ALT so best to use player 2). You
should see characters displayed, just as if they were typed on the
keyboard.
Reassigning
keycodes
This is done using WinIPAC V2. For full instructions
click here.
I-PAC boards support
left/right mouse buttons plus game controller buttons, volume
up/down, power, sleep and wake, in addition to keyboard keys. Extensive
macro support is available.
Shift
Mode
Pressing and holding 1player
start enables shift
mode with access to the following keys (when "MAME" setting is used):
2
player start=Esc – for
jumping
back to the menu
Joystick
left=Enter – for
running
games in Windows and for MAME game config menu
Joystick
right=Tab – for
entering
MAME config menu
Joystick
up=~ - for entering MAME
volume/gamma menu
Joystick
down=P MAME pause key
1
fire (button 1)=5 –
for
simulating coin insert.
The above shift keys can be changed/turned off as required if the board
is programmed.
MAME
HINT: to get past "Type OK
to continue" prompt, just move
joystick left then right.
Additional
Info
KEYBOARD:
PC should pass BIOS keyboard
self-test with or without a normal keyboard connected. The unit is
capable of being used in a closed arcade cabinet with no additional
keyboard or controls and motherboard booting into an emulation menu. If
an auxiliary keyboard is connected it can be used fully and even used
during gameplay alongside your control panel.
USB
DOS SUPPORT: Most PCs support
a
USB
keyboard in DOS mode so I-PAC in USB mode MAY work in DOS. (USB
keyboard support may have to be enabled in the BIOS). HOWEVER: many
BIOSes have poor USB support which prevent use for gaming, as the
response is too slow. USB is intended for Windows use, either in a "DOS
box" or a windows application.
USING
TWO I-PACs TOGETHER: Two
boards
can
be used for doubling the number of inputs. Each board can be
individually programmed with the required code set,
then the two boards can be connected together as above.
WIRING TWO JOYSTICKS TO
THE
SAME CONNECTION: This
is fine, and is often done when using a dedicated 4-way joystick
alongside an 8-way. Both joysticks could be wired to the Player 1
inputs. They will both perform the same function of course.
Using
the Accelerometer on I-PAC UIO (Special Verion Only)
The accelerometer, when enabled in WinIPAC causes up/down/right/left
arrow keys to be sent when the unit is nudged.
The firmware and software for this feature is currently available as a
beta version on request.
Using
the Expansion/Trackball/Spinner interface on I-PAC 2
These pins form a dual-purpose interface. The function is configured in
the "config" tab in WinIPAC.
There are 2 modes:
Expansion
Interface Disabled:
In this mode, an Ultimarc U-Trak
trackball and SpinTrak spinner can be directly plugged into the header
pins. The wire colors are marked.
Expansion
Interface Enabled: In
this mode, one or two Ultimarc
Xbox360/PS3/Xinput converters can be plugged into the header pins. The
wire colors are marked.
Troubleshooting
General Approach:
Remember that the I-PAC emulates a keyboard. So if you bear this in
mind, you can use any program that displays text to test the response
with certain limitations. Notepad or the DOS prompt can be used for
example. You can connect a short piece of wire to GND and use the other
end to touch onto various input connections, and characters should be
typed on the screen. Bear in mind, though, that the default MAME
configuration includes many non-printing keys such as ALT, CTRL and the
arrow keys, so trying the player 2 inputs is best as these are all
printable characters.
But Notepad or DOS cannot tell you whether an input is "stuck" though
so is not a complete test. For Windows, the best test is the
Passmark
keyboard Test
which we can recommend downloading. It's a 30-day trial version but
hopefully you will have it working by then!
Problem: Player 2 buttons 5
and 6 not working.
This is not an I-PAC problem! By default, MAME does not have these
buttons assigned to any keycodes. Just go into the MAME controls menu
(press tab in a game) and assign them. Button 5 is "I" and Button 6 is
"K".
Problem:
No shift functions work.
Part of the shift function design means that to avoid "stuck" keys,
shift functions are disabled when any key is pressed. So loss of shift
functions means you have a shorted or stuck switch.
Problem:
Erratic behaviour of joystick
directions. Shift functions not working. "Stuck" keys.
A very common cause is connection of the inputs to the "NC" contact on
the switches instead of "NO". See the "no shift functions work" heading
above for more info. This type of problem usually occurs when a large
number of switches are incorrectly connected. The self-test LED will
indicate this problem by flashing at power-up then staying off.
Problem:
In USB mode, the I-PAC was not
detected properly once before and now I can't get it out of this state.
You will need to remove it from
Windows and let it re-detect. Go into
Control Panel, System, Device Manager, Hardware. Open up the USB
controller by clicking on the plus sign next to it. Under this heading
will be displayed all the USB devices. Right click on all devices one
by one except the controller itself and Root Hubs and select
"uninstall". Now unplug and re-plug the I-PAC. It should be
re-detected.
Problem:
In USB mode, it is only detected
as "Unknown Device" or "device has a problem".
Under certain conditions,
shorted inputs can cause this, or inputs that
are held at 5 volts. This may happen either because of a wiring error
(see steps for checking this, above) or the I-PAC inputs being
connected to something other than an open-circuit switch. If you need
to connect non-switch devices please email for advice.
Problem:
Keys intermittently sticking in one
direction.
This is usually not an I-PAC
problem. If you check the I-PAC
installation using the
Passmark
Keyboard Test you
will probably find that this works fine and you may need to look
elsewhere on your PC installation such as some errant software
consuming PC resources.
Performing a USB Device Reset
Windows 7 and later cache information about all USB devices which is
not refreshed when the device is unplugged/reconnected. This can cause
issues with devices appearing not to work. This process is always
required when firmware is changed from versions which support game
controller device, to versions without game controller support or
vice-versa.
To reset the device settings, open Device Manager. A quick way to do
this is to click the Windows button and in the "search programs" enter:
devmgmt.msc
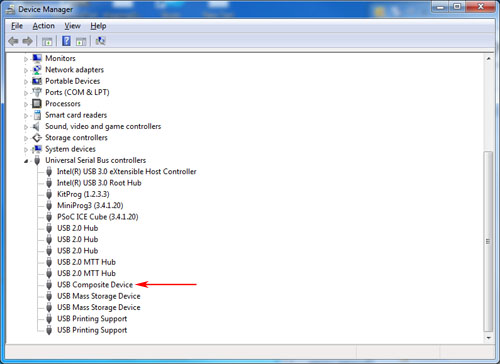
- Expand the "USB Controllers" entry
- Find the "Composite Device". There may be more than one. There is
no harm in applying this to all of them with the exception that a
keyboard with integrated trackball might be one of them and this will
prevent any further use of the trackball if uninstalled.
- Right click on the Composite Device and "Uninstall" it.
- At the the top select "Action", "Scan for New Hardware".
Alternatively, if you have "lost" your USB mouse, just unplug/reconnect
it.
How
the I-PAC Shift Button Works
When a shift button has been assigned, pressing and holding this button
causes the "SHIFTED" code page to be used. The way this works is not
the same as defining "key multiple" in an emulator.
To explain this, consider the following example which is part of the
standard I-PAC code set in non-programmable mode (and can of course
also be set up in programmable mode)
For example say "Start 1" is the shift button and "Player 1 Button 1"
is "Coin 1" in the shifted codes. Now if you set this as a key multiple
in an emulator, you could generate a coin insert by pressing these two
buttons together. BUT you would also send the code for the first button
you pressed. Imagine you are starting a game and have one coin insert
already done and you want to play a 2-player game which needs two coin
inserts. You press the key combination again to send another coin.
Unfortunately what may happen is that a one-player game will start as
you have pressed "start1" as one half of the coin key combination!
How does the I-PAC get around this? When you press the "Start 1"
(shift) button nothing happens immediately. The I-PAC waits to see if
you are going to press another key at the same time. If you do press
the "Player 1 Button 1" the shifted "Coin 1" code is sent. If you
don’t press any other button the "Start 1" code is sent when
you RELEASE the "Start 1" button. So you don’t get any
unwanted key codes.
