Ultimarc
Playstation 2 Adaptor
Playstation
1-2 Control Adaptor
Playstation 2-3 to Arcade Monitor Adaptor
Playstation 2-3 to J-PAC adaptor
Playstation
1-2 Control Adaptor
Please
note this is an end-of-life product with limited stock. This adaptor
works only with pre-2015 I-PAC boards with the PS/2 interface cable.
Click To Order
 Playstation 1-2 Control Adaptor
(Uncased)
Playstation 1-2 Control Adaptor
(Uncased)
The Playstation Adaptor converts the output from the I-PAC (must be in
PS/2 keyboard mode) into PS commands. The controls connected to the
I-PAC emulate the controls on the Playstation controller as shown in
the tables below.
Important Note: The PS controller
contains some analog controls, and your arcade control panel has
switch-type controls. This means that pressing each switch simulates
the analog control being pushed hard across. Some games (flight sims
for example) cannot be played with switch-type controls.
This adaptor can also be used with a keyboard. The keys shown in the
tables below, simulate the actions of the PS controller.
The I-PAC controls shown in the tables are only valid if the MAME
default codeset is being used in the I-PAC. If the I-PAC has been
programmed with a different codeset, the button assignments will be
different.
Hotkeys for Switching Modes
| Switch to Digital Mode |
Start1/P1 Up* |
` (key below ESC) |
| Switch to Left Analog Mode |
Start1/P1 Left* |
Enter |
| Switch to Right Analog Mode |
Start1/P1 Right* |
Tab |
| Switch to 2 into 1 Mode |
Start1/P2 Down** |
F12 |
Tip: You can remember these keys by looking at the PS
controller, and the positions of each control.
* These are I-PAC shift functions, ie hold down P1 Start
** This is not part of the default I-PAC codeset. The function is
suggested only
and can be programmed into the I-PAC if needed.
Digital Mode
| PLAYER
1 |
PLAYER 2 |
| PSX Control |
I-PAC Button |
Keyboard
Char |
PSX Control |
I-PAC Button |
Keyboard
Char |
| D-Pad Right |
P1 Right |
Right |
D-Pad Right |
P2 Right |
G |
| D-Pad Left |
P1 Left |
Left |
D-Pad Left |
P2 Left |
D |
| D-Pad Up |
P1 Up |
Up |
D-Pad Up |
P2 Up |
R |
| D-Pad Down |
P1 Down |
Down |
D-Pad Down |
P2 Down |
F |
| Start |
P1 Start |
1 |
Start |
P2 Start |
2 |
| Select |
Start1/Down* |
P |
Select |
|
F11 |
| Left Rear Button 1 |
P1 SW 1 |
L-Ctrl |
Left Rear Button 1 |
P2 SW 1 |
A |
| Button Square |
P1 SW 2 |
L-Alt |
Button Square |
P2 SW 2 |
S |
| Button Triangle |
P1 SW 3 |
Space |
Button Triangle |
P2 SW 3 |
Q |
| Right Rear Button 1 |
P1 SW 4 |
L-Shift |
Right Rear Button 1 |
P2 SW 4 |
W |
| Button X |
P1 SW 5 |
Z |
Button X |
P2 SW 5 |
I |
| Button O |
P1 SW 6 |
X |
Button O |
P2 SW 6 |
K |
| Left Rear Button 2 |
P1 SW 7 |
C |
Left Rear Button 2 |
P2 SW 7 |
J |
| Right Rear Button 2 |
P1 SW 8 |
V |
Right Rear Button 2 |
P2 SW 8 |
L |
| L-Analog Click |
Coin 1 |
5 |
L-Analog Click |
Coin 2 |
6 |
| R-Analog Click |
|
7 |
R-Analog Click |
|
8 |
| Home (PS3) |
|
F1 |
Home (PS3) |
|
F2 |
Left
Analog Mode
| PLAYER
1 |
PLAYER 2 |
| PSX Control |
I-PAC Button |
Keyboard
Char |
PSX Control |
I-PAC Button |
Keyboard
Char |
| Analog Right |
P1 Right |
Right |
Analog Right |
P2 Right |
G |
| Analog Left |
P1 Left |
Left |
Analog Left |
P2 Left |
D |
| Analog Up |
P1 Up |
Up |
Analog Up |
P2 Up |
R |
| Analog Down |
P1 Down |
Down |
Analog Down |
P2 Down |
F |
| Start |
P1 Start |
1 |
Start |
P2 Start |
2 |
| Select |
Start1/Down* |
P |
Select |
|
F11 |
| Left Rear Button 1 |
P1 SW 1 |
L-Ctrl |
Left Rear Button 1 |
P2 SW 1 |
A |
| Button Square |
P1 SW 2 |
L-Alt |
Button Square |
P2 SW 2 |
S |
| Button Triangle |
P1 SW 3 |
Space |
Button Triangle |
P2 SW 3 |
Q |
| Right Rear Button 1 |
P1 SW 4 |
L-Shift |
Right Rear Button 1 |
P2 SW 4 |
W |
| Button X |
P1 SW 5 |
Z |
Button X |
P2 SW 5 |
I |
| Button O |
P1 SW 6 |
X |
Button O |
P2 SW 6 |
K |
| Left Rear Button 2 |
P1 SW 7 |
C |
Left Rear Button 2 |
P2 SW 7 |
J |
| Right Rear Button 2 |
P1 SW 8 |
V |
Right Rear Button 2 |
P2 SW 8 |
L |
| L-Analog Click |
Coin 1 |
5 |
L-Analog Click |
Coin 2 |
6 |
| R-Analog Click |
|
7 |
R-Analog Click |
|
8 |
| Home (PS3) |
|
F1 |
Home (PS3) |
|
F2 |
Right Analog Mode
| PLAYER
1 |
PLAYER 2 |
| PSX Control |
I-PAC Button |
Keyboard
Char |
PSX Control |
I-PAC Button |
Keyboard
Char |
| Analog Right |
P1 Right |
Right |
Analog Right |
P2 Right |
G |
| Analog Left |
P1 Left |
Left |
Analog Left |
P2 Left |
D |
| Analog Up |
P1 Up |
Up |
Analog Up |
P2 Up |
R |
| Analog Down |
P1 Down |
Down |
Analog Down |
P2 Down |
F |
| Start |
P1 Start |
1 |
Start |
P2 Start |
2 |
| Select |
Start1/Down* |
P |
Select |
|
F11 |
| Left Rear Button 1 |
P1 SW 1 |
L-Ctrl |
Left Rear Button 1 |
P2 SW 1 |
A |
| Button Square |
P1 SW 2 |
L-Alt |
Button Square |
P2 SW 2 |
S |
| Button Triangle |
P1 SW 3 |
Space |
Button Triangle |
P2 SW 3 |
Q |
| Right Rear Button 1 |
P1 SW 4 |
L-Shift |
Right Rear Button 1 |
P2 SW 4 |
W |
| Button X |
P1 SW 5 |
Z |
Button X |
P2 SW 5 |
I |
| Button O |
P1 SW 6 |
X |
Button O |
P2 SW 6 |
K |
| Left Rear Button 2 |
P1 SW 7 |
C |
Left Rear Button 2 |
P2 SW 7 |
J |
| Right Rear Button 2 |
P1 SW 8 |
V |
Right Rear Button 2 |
P2 SW 8 |
L |
| L-Analog Click |
Coin 1 |
5 |
L-Analog Click |
Coin 2 |
6 |
| R-Analog Click |
|
7 |
R-Analog Click |
|
8 |
| Home (PS3) |
|
F1 |
Home (PS3) |
|
F2 |
2 Into 1 Mode (One
player uses entire 2-player panel)
| PLAYER
1 |
| PSX Control |
I-PAC Button |
Keyboard
Char |
| L-Analog Right |
P1 Right |
Right |
| L-Analog Left |
P1 Left |
Left |
| L-Analog Up |
P1 Up |
Up |
| L-Analog Down |
P1 Down |
Down |
| R-Analog Right |
P2 Right |
G |
| R-Analog Left |
P2 Left |
D |
| R-Analog Up |
P2 Up |
R |
| R-Analog Down |
P2 Down |
F |
| Start |
P1 Start |
1 |
| D-Pad Right |
P2 SW 1 |
A |
| D-Pad Left |
P2 SW 2 |
S |
| D-Pad Up |
P2 SW 3 |
Q |
| D-Pad Down |
P2 SW 4 |
W |
| Select |
Start1/Down* |
P |
| Left Rear Button 1 |
P1 SW 1 |
L-Ctrl |
| Button Square |
P1 SW 2 |
L-Alt |
| Button Triangle |
P1 SW 3 |
Space |
| Right Rear Button 1 |
P1 SW 4 |
L-Shift |
| Button X |
P1 SW 5 |
Z |
| Button O |
P1 SW 6 |
X |
| Left Rear Button 2 |
P1 SW 7 |
C |
| Right Rear Button 2 |
P1 SW 8 |
V |
| L-Analog Click |
Coin 1 |
5 |
| L-Analog Click |
|
7 |
| Home (PS3) |
|
F1 |
Playstation 2/3 to Arcade Monitor/Speaker
Adaptor
Click To Order
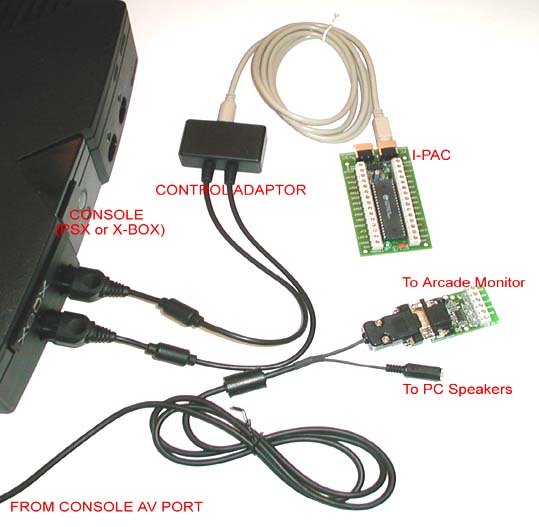
This cable plugs into the Playstation 2 AV port. It includes a video
amplifier which boosts the PS video signal to the level required by
arcade monitors. It also includes a sync separator circuit. You can
also plug in a pair of amplified speakers for sound. The picture shows
all connections required for an PS to arcade monitor, speakers and
wired controls. The parts you need to order are:
Playstation Control Adaptor
PS AV to Arcade Monitor/Speaker Adaptor
I-PAC (you must select the PS/2 cable option for this)
IMPORTANT! This cable only works with 15Khz arcade monitors. It will
NOT work with PC monitors. If your arcade monitor is a multi-frequency
model (eg W-G D9500) and has a VGA connector then the J-PAC adaptor
(below) is the best choice.
Playstation 2/3 to JAMMA Adaptors
Includes a sync separator chip (inside the D-Plug housing)
This adaptor is also the correct type for use with multi-frequency
monitors which have a VGA plug (eg W-G D9500) These monitors should be
connected direct to this adaptor in all cases, even if you have a J-PAC