Ultimarc Wii / Playstation 2
Adaptors
Wii /PS2 Control Adaptor
Wii / PS2 to Arcade Monitor Adaptor (Screw Terminal)
Wii / PS2 to
J-PAC/Monitor Adaptor (VGA Plug)
Wii /
Playstation Control Adaptor
Click To
Order
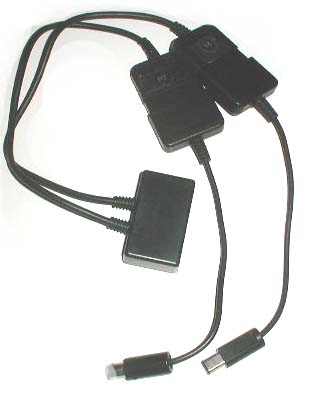
The PS2 / Wii
Control Adaptor contains multiple connectors which can be used with either the
Playstation 1 or 2 or Wii console. (Also works on Gamecube)
The Wii / PS2
Adaptor converts the output from the I-PAC (must have the PS/2 keyboard cable
option, not USB) into Wii or PS2 commands. The controls connected to the I-PAC
emulate the controls on the console controller as shown in the tables below.
Important Note: The original console controllers contains some analog
controls, and your arcade control panel has switch-type controls. This means
that pressing each switch simulates the analog control being pushed hard
across. Some games (flight sims for example) cannot be played with switch-type
controls. On the Wii, only games which support the Classic Controller will
work.
This adaptor can also be used with a keyboard. The keys shown in the
tables below, simulate the actions of the original console controller.
The I-PAC controls shown in the tables are only valid if the MAME
default codeset is being used in the I-PAC. If the I-PAC has been programmed
with a different codeset, the button assignments will be different.
Hotkeys for Switching Modes
| Switch to Digital Mode |
Start1/P1 Up* |
` (key below ESC) |
| Switch to Left Analog Mode |
Start1/P1 Left* |
Enter |
| Switch to Right Analog Mode |
Start1/P1 Right* |
Tab |
| Switch to 2 into 1 Mode |
Start1/P2 Down** |
F12 |
* These are I-PAC shift functions, ie hold down P1
Start
** This is not part of the default I-PAC codeset. The function is
suggested only
and can be programmed into the I-PAC if needed.
Digital Mode
| PLAYER 1 |
PLAYER 2 |
| Wii Control |
PSX Control |
I-PAC Button |
Keyboard Char |
Wii Control |
PSX Control |
I-PAC Button |
Keyboard Char |
| D-Pad Right |
D-Pad Right |
P1 Right |
Right |
D-Pad Right |
D-Pad Right |
P2 Right |
G |
| D-Pad Left |
D-Pad Left |
P1 Left |
Left |
D-Pad Left |
D-Pad Left |
P2 Left |
D |
| D-Pad Up |
D-Pad Up |
P1 Up |
Up |
D-Pad Up |
D-Pad Up |
P2 Up |
R |
| D-Pad Down |
D-Pad Down |
P1 Down |
Down |
D-Pad Down |
D-Pad Down |
P2 Down |
F |
| Start |
Start |
P1 Start |
1 |
Start |
Start |
P2 Start |
2 |
| |
Select |
Start1/Down* |
P |
|
Select |
|
F11 |
| ZL |
Left Rear Button 1 |
P1 SW 1 |
L-Ctrl |
ZL |
Left Rear Button 1 |
P2 SW 1 |
A |
| B |
Button Square |
P1 SW 2 |
L-Alt |
B |
Button Square |
P2 SW 2 |
S |
| X |
Button Triangle |
P1 SW 3 |
Space |
X |
Button Triangle |
P2 SW 3 |
Q |
| ZR |
Right Rear Button 1 |
P1 SW 4 |
L-Shift |
ZR |
Right Rear Button 1 |
P2 SW 4 |
W |
| A |
Button X |
P1 SW 5 |
Z |
A |
Button X |
P2 SW 5 |
I |
| Y |
Button O |
P1 SW 6 |
X |
Y |
Button O |
P2 SW 6 |
K |
| L |
Left Rear Button 2 |
P1 SW 7 |
C |
L |
Left Rear Button 2 |
P2 SW 7 |
J |
| R |
Right Rear Button 2 |
P1 SW 8 |
V |
R |
Right Rear Button 2 |
P2 SW 8 |
L |
| |
L-Analog Click |
Coin 1 |
5 |
|
L-Analog Click |
Coin 2 |
6 |
| |
R-Analog Click |
|
7 |
|
R-Analog Click |
|
8 |
Left Analog
Mode
| |
PLAYER 1 |
|
PLAYER 2 |
| Wii Control |
PSX Control |
I-PAC Button |
Keyboard Char |
Wii Control |
PSX Control |
I-PAC Button |
Keyboard Char |
| Analog Right |
Analog Right |
P1 Right |
Right |
Analog Right |
Analog Right |
P2 Right |
G |
| Analog Left |
Analog Left |
P1 Left |
Left |
Analog Left |
Analog Left |
P2 Left |
D |
| Analog Up |
Analog Up |
P1 Up |
Up |
Analog Up |
Analog Up |
P2 Up |
R |
| Analog Down |
Analog Down |
P1 Down |
Down |
Analog Down |
Analog Down |
P2 Down |
F |
| Start |
Start |
P1 Start |
1 |
Start |
Start |
P2 Start |
2 |
|
Select |
Start1/Down* |
P |
|
Select |
|
F11 |
| ZL |
Left Rear Button 1 |
P1 SW 1 |
L-Ctrl |
ZL |
Left Rear Button 1 |
P2 SW 1 |
A |
| B |
Button Square |
P1 SW 2 |
L-Alt |
B |
Button Square |
P2 SW 2 |
S |
| X |
Button Triangle |
P1 SW 3 |
Space |
X |
Button Triangle |
P2 SW 3 |
Q |
| ZR |
Right Rear Button 1 |
P1 SW 4 |
L-Shift |
ZR |
Right Rear Button 1 |
P2 SW 4 |
W |
| A |
Button X |
P1 SW 5 |
Z |
A |
Button X |
P2 SW 5 |
I |
| Y |
Button O |
P1 SW 6 |
X |
Y |
Button O |
P2 SW 6 |
K |
| L |
Left Rear Button 2 |
P1 SW 7 |
C |
L |
Left Rear Button 2 |
P2 SW 7 |
J |
| R |
Right Rear Button 2 |
P1 SW 8 |
V |
R |
Right Rear Button 2 |
P2 SW 8 |
L |
| |
L-Analog Click |
Coin 1 |
5 |
|
L-Analog Click |
Coin 2 |
6 |
| |
R-Analog Click |
|
7 |
|
R-Analog Click |
|
8 |
Right Analog Mode
| |
PLAYER 1 |
|
PLAYER 2 |
| Wii Control |
PSX Control |
I-PAC Button |
Keyboard Char |
Wii Control |
PSX Control |
I-PAC Button |
Keyboard Char |
| Analog Right |
Analog Right |
P1 Right |
Right |
Analog Right |
Analog Right |
P2 Right |
G |
| Analog Left |
Analog Left |
P1 Left |
Left |
Analog Left |
Analog Left |
P2 Left |
D |
| Analog Up |
Analog Up |
P1 Up |
Up |
Analog Up |
Analog Up |
P2 Up |
R |
| Analog Down |
Analog Down |
P1 Down |
Down |
Analog Down |
Analog Down |
P2 Down |
F |
| Start |
Start |
P1 Start |
1 |
Start |
Start |
P2 Start |
2 |
| |
Select |
Start1/Down* |
P |
|
Select |
|
F11 |
| ZL |
Left Rear Button 1 |
P1 SW 1 |
L-Ctrl |
ZL |
Left Rear Button 1 |
P2 SW 1 |
A |
| B |
Button Square |
P1 SW 2 |
L-Alt |
B |
Button Square |
P2 SW 2 |
S |
| X |
Button Triangle |
P1 SW 3 |
Space |
X |
Button Triangle |
P2 SW 3 |
Q |
| ZR |
Right Rear Button 1 |
P1 SW 4 |
L-Shift |
ZR |
Right Rear Button 1 |
P2 SW 4 |
W |
| A |
Button X |
P1 SW 5 |
Z |
A |
Button X |
P2 SW 5 |
I |
| Y |
Button O |
P1 SW 6 |
X |
Y |
Button O |
P2 SW 6 |
K |
| L |
Left Rear Button 2 |
P1 SW 7 |
C |
L |
Left Rear Button 2 |
P2 SW 7 |
J |
| R |
Right Rear Button 2 |
P1 SW 8 |
V |
R |
Right Rear Button 2 |
P2 SW 8 |
L |
| |
L-Analog Click |
Coin 1 |
5 |
|
L-Analog Click |
Coin 2 |
6 |
| |
R-Analog Click |
|
7 |
|
R-Analog Click |
|
8 |
2 Into 1 Mode (One player
uses entire 2-player panel)
| |
PLAYER 1 |
| Wii Button |
PSX Control |
I-PAC Button |
Keyboard Char |
| L-Analog Right |
L-Analog Right |
P1 Right |
Right |
| L-Analog Left |
L-Analog Left |
P1 Left |
Left |
| L-Analog Up |
L-Analog Up |
P1 Up |
Up |
| L-Analog Down |
L-Analog Down |
P1 Down |
Down |
| R-Analog Right |
R-Analog Right |
P2 Right |
G |
| R-Analog Left |
R-Analog Left |
P2 Left |
D |
| R-Analog Up |
R-Analog Up |
P2 Up |
R |
| R-Analog Down |
R-Analog Down |
P2 Down |
F |
| Start |
Start |
P1 Start |
1 |
| D-Pad Right |
D-Pad Right |
P2 SW 1 |
A |
| D-Pad Left |
D-Pad Left |
P2 SW 2 |
S |
| D-Pad Up |
D-Pad Up |
P2 SW 3 |
Q |
| D-Pad Down |
D-Pad Down |
P2 SW 4 |
W |
| |
Select |
Start1/Down* |
P |
| ZL |
Left Rear Button 1 |
P1 SW 1 |
L-Ctrl |
| B |
Button Square |
P1 SW 2 |
L-Alt |
| X |
Button Triangle |
P1 SW 3 |
Space |
| ZR |
Right Rear Button 1 |
P1 SW 4 |
L-Shift |
| A |
Button X |
P1 SW 5 |
Z |
| Y |
Button O |
P1 SW 6 |
X |
| L |
Left Rear Button 2 |
P1 SW 7 |
C |
| R |
Right Rear Button 2 |
P1 SW 8 |
V |
| |
L-Analog Click |
Coin 1 |
5 |
| |
L-Analog Click |
|
7 |
Wii AV to Arcade Monitor/Speaker
Adaptor (Screw Connect)
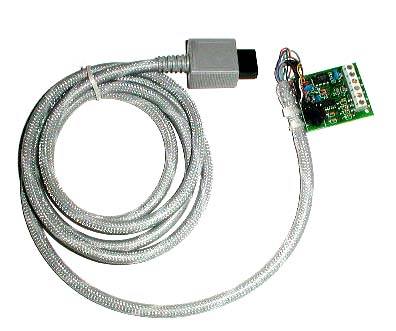
Click To OrderThis cable plugs into the Wii AV
port. It includes a video amplifier which boosts the Wii video signal to the
level required by arcade monitors. It also includes a sync separator circuit.
You can also plug in a pair of amplified speakers for sound. The monitor
connects using screw connectors for R, G, B, Sync and GND.
IMPORTANT! This
cable only works with 15Khz arcade monitors. It will NOT work with PC monitors.
If your arcade monitor is a multi-frequency model (eg W-G D9500) and has a VGA
connector then the adaptor with VGA plug (below) is the best
choice.
Wii AV to J-PAC / Monitor /
Speaker Adaptor (D Plug)
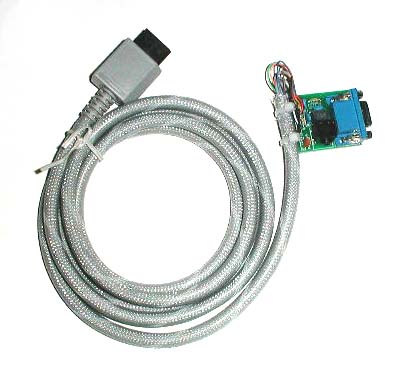
This adaptor is also the correct type for use with multi-frequency monitors
which have a VGA plug (eg W-G D9500) These monitors should be connected direct
to this adaptor in all cases, even if you have a J-PAC. This adaptor will NOT
work with PC monitors. It will only work with 15Khz arcade monitors (via a
J-PAC) or multi-frequency monitors such as the W-G D9400.
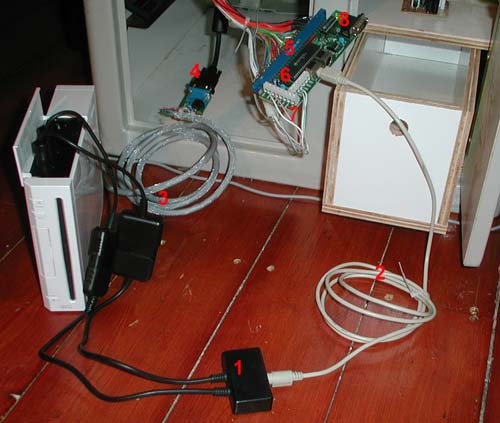
The picture below shows a complete PSX to JAMMA setup. Note this shows
a cabinet with a multi-frequency monitor.